


Let's do Test Driven Development (TDD) in JavaScript! 🤘
This post is a stepping stone into the realm of TDD and Object-Oriented Programming (OOP).
But before we dive in, you may want to check this introductory post about installing, configuring and using Jest:
Introduction to Test-Driven Development in JavaScript
Test Driven Development is a modern software development process where you write tests before you write the corresponding code.
It's like setting up checkpoints for what your code should achieve before diving into the code itself.
TDD can lead to cleaner, more reliable code. It encourages you to think through your design, leading to fewer bugs and more maintainable code.
In JavaScript, where the ecosystem is vast and dynamic, TDD keeps you grounded with a safety net for refactoring and adding features without being scared that it will break what is already working.
What we'll build: the RPG Combat Kata
We'll tackle the RPG Combat Kata, a challenge that involves building simple combat rules for a role-playing game.
It's a perfect scenario to practice TDD and JavaScript together, due to its progressively complex business rules that mirror the intricacies of real-world software development.
Check out the full RPG Combat Kata exercise at this GitHub repo:
Setting up the JavaScript project
We start by setting up our project environment. After creating a folder named rpg-combat-kata, we initialize our project with npm:
npm init -y
Next, we install Jest, a powerful JavaScript testing framework with a focus on simplicity:
npm i -D jest
Edit your package.json file to look like this:
{
  "name": "rpg-combat-kata",
  "version": "1.0.0",
  "description": "",
  "main": "index.js",
  "type": "module",
  "scripts": {
    "dev": "nodemon src/index.js",
    "test": "NODE_OPTIONS=--experimental-vm-modules npx jest --runInBand --watchAll --config ./jest.config.js",
    "coverage": "NODE_OPTIONS=--experimental-vm-modules npx jest --config ./jest.config.js --coverage"
  },
  "keywords": [],
  "author": "",
  "license": "ISC",
  "devDependencies": {
    "jest": "^29.7.0"
  }
}
Then, create a file named jest.config.js in the project root and paste the following code:
/*
 * For a detailed explanation regarding each configuration property, visit:
 * https://jestjs.io/docs/en/configuration.html
 */

export default {
  // Automatically clear mock calls and instances between every test
  clearMocks: true,

  // The directory where Jest should output its coverage files
  coverageDirectory: "coverage",

  // Indicates which provider should be used to instrument code for coverage
  coverageProvider: "v8",

  // A list of reporter names that Jest uses when writing coverage reports
  coverageReporters: ["json", "text", "lcov", "clover"],

  // An object that configures minimum threshold enforcement for coverage results
  coverageThreshold: {
    global: {
      branches: 100,
      functions: 100,
      lines: 100,
      statements: 100,
    },
  },

  // The maximum amount of workers used to run your tests. Can be specified as % or a number. E.g. maxWorkers: 10% will use 10% of your CPU amount + 1 as the maximum worker number. maxWorkers: 2 will use a maximum of 2 workers.
  maxWorkers: "50%",

  // The test environment that will be used for testing
  testEnvironment: "node",
};
Read my full post about installing and setting Jest up in a project:
Test Driven Development: Iteration One overview
The requirements of Iteration One
In our first iteration, we set the stage with our characters' basic attributes: health, level, and alive status. We also define how they interact through damage and healing.
All Characters, when created, have:
Health, starting at 1000
Level, starting at 1
May be Alive or Dead, starting Alive (Alive may be a true/false)
Characters can Deal Damage to Characters.
Damage is subtracted from Health
When damage received exceeds current Health, Health becomes 0 and the character dies
A Character can Heal a Character.
Dead characters cannot be healed
Healing cannot raise health above 1000
The role of tests in Iteration One
Our tests will guide the development, ensuring we meet the requirements as we go. We'll write tests that describe the expected behavior of our characters according to the business rules.
Let's begin by creating a /test/Character.test.js file and writing all test cases for Iteration One in advance:
// /test/Character.test.js
import { beforeEach, describe, expect, jest, test } from "@jest/globals";
import Character from "../src/Character";

describe("Character", () => {
  describe("when created", () => {
    test.todo("has 1000 health points");
    test.todo("has 1 level");
    test.todo("is alive");
  });

  describe("when damaged", () => {
    test.todo("decreases health points by the exact amount of damage received");
    test.todo("dies when damage received exceeds current health points");
  });

  describe("when healed", () => {
    test.todo("is not healed when dead");
    test.todo("is healed by the exact amount of health points received");
    test.todo("cannot be healed above 1000 health points");
  });
});
Also, create the /src/Character.js file with the following stub:
export default class Character {}
Writing our first test in Jest
Structuring the character creation Test
We begin by writing the tests for creating a character having 1000 health points. Here's how we express this in Jest:
test("has 1000 health points", () => {
  const character = new Character();
  expect(character.health).toBe(1000);
});
Running and watching tests fail
Initially, our tests fail, which is expected in TDD. This red phase is a natural part of the cycle: 🔴 Red, 🟢 Green, 🔵 Refactor, which means that we first create a test, see it fail, write the minimum code to pass the test and improve the code as we go.
Open your terminal and run npm run test to run the tests now and keep Jest's test engine running. You should see something like this:
Implementing features to pass tests
Building the Character class
To pass our first test, we implement the Character class. We ensure it initializes with the correct health points:
const STARTING_HEALTH = 1000;

export default class Character {
  #health = STARTING_HEALTH;

  get health() {
    return this.#health;
  }
}
We use private properties to encapsulate the character's health, making it accessible for reading but not directly modifiable, which helps us avoid bugs.
And here's a first lesson: if we don't really need our properties to be modifiable, we don't allow it. Keep it read-only and enable writing at a later stage if it becomes a requirement.
All 3 tests for creating a Character:
describe("when created", () => {
  test("has 1000 health points", () => {
    const character = new Character();
    expect(character.health).toBe(1000);
  });
  test("has 1 level", () => {
    const character = new Character();
    expect(character.level).toBe(1);
  });
  test("is alive", () => {
    const character = new Character();
    expect(character.isAlive).toBe(true);
  });
});
And the Character class implementation to match:
const STARTING_HEALTH = 1000;
const STARTING_LEVEL = 1;

export default class Character {
  #health;
  #level;

  constructor() {
    this.#health = STARTING_HEALTH;
    this.#level = STARTING_LEVEL;
  }

  get health() {
    return this.#health;
  }

  get level() {
    return this.#level;
  }

  get isAlive() {
    return this.#health > 0;
  }
}
Dealing with damage: TDD approach
Writing tests for damage logic
We write tests to describe how characters receive damage:
describe("when damaged", () => {
  test("decreases health points by the exact amount of damage received", () => {
    const attacker = new Character();
    const defender = new Character();
    attacker.attack(defender);
    expect(defender.health).toBe(900);
  });
  test.todo("dies when damage received exceeds current health points");
});
Our Character class evolves to handle damage, adhering strictly to the tests we've written:
const STARTING_HEALTH = 1000;
const STARTING_LEVEL = 1;
const POWER = 100;

export default class Character {
  #health;
  #level;

  constructor() {
    this.#health = STARTING_HEALTH;
    this.#level = STARTING_LEVEL;
  }

  get health() {
    return this.#health;
  }

  get level() {
    return this.#level;
  }

  get isAlive() {
    return this.#health > 0;
  }

  attack(target) {
    target.#health -= POWER;
  }
}
The inclusion of an attack method is a deliberate design choice that aligns with the stipulated business rule: "Characters can Deal Damage to Characters."
This method deducts a fixed amount of health—defined by the constant POWER—from the defender. This decision was shaped by the ambiguous nature of the requirements regarding the mechanics of combat damage.
Ideally, in a real-world setting, such ambiguities would be clarified through a dialogue with project stakeholders. However, in the context of this exercise—and often in professional environments—such direct clarification may not be feasible. Stakeholders might not be readily accessible, or they may not have immediate answers.
In these instances, it becomes our responsibility as developers to infer a sensible solution that aligns with the broader vision of the project. Therefore, setting
POWERas a constant is a reflection of an informed judgment call, one that maintains the integrity of the combat system within the RPG Combat Kata while awaiting further details.
Also, while a receiveDamage method could technically achieve the desired outcome, it would not reflect the active nature of an attack as described in the requirements.
By choosing to implement an attack method, we ensure our code not only meets the functional needs but also accurately represents the intended interactions and behaviors of the game's domain, maintaining the integrity and clarity of our model.
Lastly, let's examine something very interesting in this implementation of the attack method:
attack(target) {
  target.#health -= POWER;
}
In JavaScript, the hash
#prefix denotes a private field, meaning it cannot be accessed or modified directly outside of the class's own methods. However, within the class's methods, private fields are fully accessible.It's important to note that the
attackmethod is able to access the private#healthproperty of thetargetonly because the target is also an instance of the Character class.This is a subtle but powerful feature of class-based encapsulation in JavaScript: private fields are accessible by all instances of the class, not just the instance that owns the property.
This allows instances of the same class to interact with each other's private data, enabling a controlled form of interaction that's still in line with the principles of object-oriented programming.
Right, then. Following up with the second damage requirement, we write the test:
describe("when damaged", () => {
  test("decreases health points by the exact amount of damage received", () => {
    // ...
  });
  test("dies when damage received exceeds current health points", () => {
    const attacker = new Character();
    const defender = new Character();
    for (let i = 0; i < 10; i++) attacker.attack(defender);
    expect(defender.isAlive).toBe(false);
  });
});
And we should need no further changes to the Character class in this case because of how we implemented the isAlive property:
get isAlive() {
  return this.#health > 0;
}
This is a strong quality of OOP: encapsulation, which tells us to model data and behavior together under the same roof.
Healing characters with TDD
Crafting tests for the healing functionality
Healing is next. We write tests to ensure characters are healed correctly and can't be over-healed:
describe("when healed", () => {
  test("is not healed when dead", () => {
    const attacker = new Character();
    const defender = new Character();
    for (let i = 0; i < 10; i++) attacker.attack(defender);
    expect(defender.isAlive).toBe(false);
    attacker.heal(defender);
    expect(defender.health).toBe(0);
    expect(defender.isAlive).toBe(false);
  });
  test("is healed by the exact amount of health points received", () => {
    const attacker = new Character();
    const defender = new Character();
    for (let i = 0; i < 5; i++) attacker.attack(defender);
    expect(defender.health).toBe(500);
    attacker.heal(defender);
    expect(defender.health).toBe(600);
  });
  test("cannot be healed above 1000 health points", () => {
    const attacker = new Character();
    const defender = new Character();
    attacker.attack(defender);
    expect(defender.health).toBe(900);
    attacker.heal(defender);
    attacker.heal(defender);
    expect(defender.health).toBe(1000);
  });
});
Coding the healing method to pass the tests
Our Character class gains the ability to heal, as dictated by our tests:
const STARTING_HEALTH = 1000;
const STARTING_LEVEL = 1;
const POWER = 100;

export default class Character {
  #health;
  #level;

  constructor() {
    this.#health = STARTING_HEALTH;
    this.#level = STARTING_LEVEL;
  }

  get health() {
    return this.#health;
  }

  get level() {
    return this.#level;
  }

  get isAlive() {
    return this.#health > 0;
  }

  attack(target) {
    target.#health -= POWER;
  }

  heal(other) {
    if (!other.isAlive) return;
    const newHealth = other.#health + POWER;
    other.#health = Math.min(newHealth, STARTING_HEALTH);
  }
}
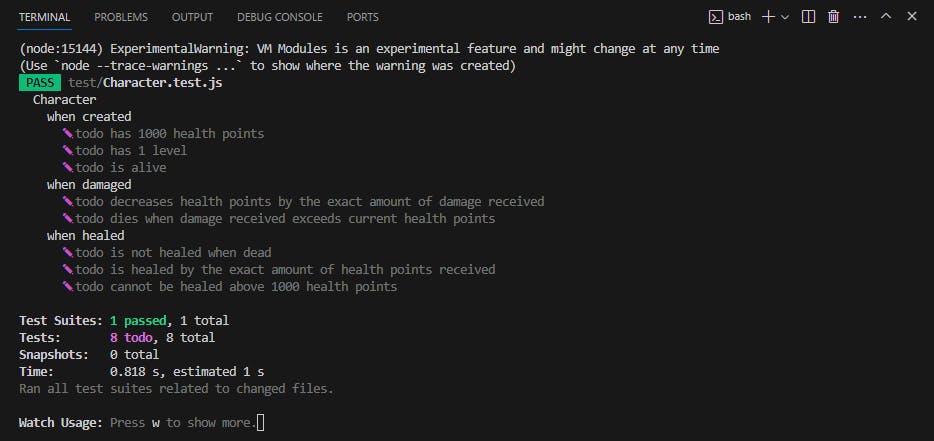
At this point, your tests should be passing and your terminal should look like this (remember, run npm run test to keep the tests running):

Wrapping up Iteration One
Reviewing our TDD process
We've now completed the first iteration of our RPG Combat Kata using Test Driven Development in JavaScript. We've written tests, seen them fail, and then implemented the minimum code to pass them.
Preview of upcoming iterations and posts
This is just the beginning. Future posts will delve into more complex scenarios, further exploring the power of TDD in JavaScript as we complete all iterations of the RPG Combat Kata.
Conclusion
TDD is more than a development technique; it's a mindset. By embracing TDD in JavaScript or any other programming language, we ensure our code is robust from the start and remains adaptable to change.
Stay tuned for the next post, where we'll tackle the subsequent iterations of our RPG Combat Kata, armed with the power of TDD and JavaScript.